What is Icon Resin Infiltration for White Spots?
Icon resin infiltration is a minimally invasive dental treatment designed to improve the appearance of white spot lesions on teeth.
White spots are areas on your teeth that appear lighter or chalky, often caused by developmental defects, early tooth decay, mineral loss, or the effects of braces.
These spots can make your smile look uneven and may be a source of concern, but Icon resin infiltration can help restore the tooth’s natural look without the need for drilling or extensive procedures.
How Does Icon Resin Infiltration Work?
- Application of a gel: The process begins with the application of a special gel, which is a liquid substance that has a unique ability to penetrate into the enamel of the tooth. This gel is applied directly to the white spot lesions.
- Infiltration: The resin is allowed to soak into the tooth enamel, where it fills the porous areas created by the mineral loss. This helps to smooth and blend the affected areas with the rest of the tooth’s surface.
- Curing: After the resin is applied, a special light is used to harden it, ensuring it stays in place and solidifies inside the tooth structure. The result is a more uniform, natural-looking surface where the white spots are much less noticeable.
What Are the Benefits of Icon Resin Infiltration?
- No Need for Drilling or Injections: Unlike traditional fillings, Icon resin infiltration doesn’t require any drilling or anaesthesia, making it a more comfortable treatment option.
- Conservative Treatment: The process is minimally invasive and preserves the natural structure of your teeth. It doesn’t require removing healthy tooth material.
- Quick and Effective: The procedure is completed in a single visit and can significantly improve the appearance of your teeth right away.
- Natural Results: The resin blends seamlessly with the natural colour of your teeth, giving you a more uniform, healthy-looking smile.
- Prevents Further Decay: By sealing the white spot lesions, Icon can help prevent further demineralisation and potential cavities.
How Long Does Icon Resin Infiltration Take?
ICON resin infiltration requires one visit to the dentist, after consultation. The procedure is typically completed in about 45-60 minutes.
Who Can Benefit from Icon Resin Infiltration?
1. Patients with tooth decay or white spot lesions. Icon resin infiltration is an excellent option for patients with early-stage tooth decay or white spot lesions, often caused by braces. It’s common to see white spots after orthodontic treatment due to difficulty in cleaning around braces.
2. Patients with Fluorosis: Overexposure to fluoride during early childhood can result in white spots on the teeth.
3. Patients with enamel Hypoplasia: This condition involves the underdevelopment of enamel, leading to discoloured spots.
Is Icon Resin Infiltration Safe?
Yes, Icon resin infiltration is a safe and effective treatment option. The materials used are specifically designed for use on teeth, and the process is performed by a trained dental professional. It doesn’t harm your natural enamel.
How Long Does the Treatment Last?
Icon resin infiltration gives a stable result that lasts many years, depending on your oral hygiene habits and lifestyle. It’s important to continue brushing, flossing, and seeing your dentist regularly to maintain the best results.
How Much Does ICON Treatment Cost?
White spot treatment with ICON resin infiltration typically costs between £600- £900.
Icon resin infiltration is a great option for treating white spot lesions on your teeth, offering a minimally invasive, quick, and effective solution to improve your smile. With no need for drilling, it’s a safe, comfortable way to restore the natural look of your teeth and protect them from further decay.
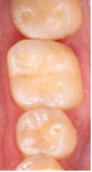
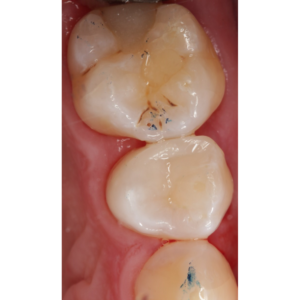
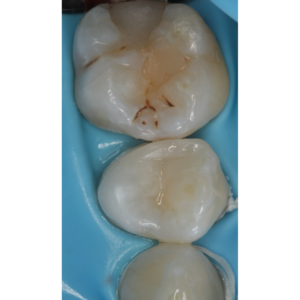
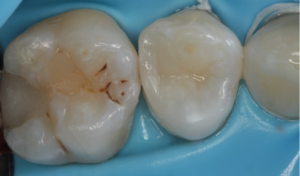
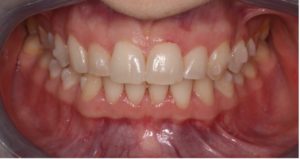
ICON Treatment Reults
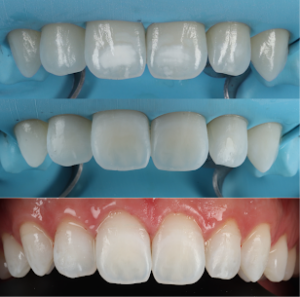
Incredible results with just teeth whitening and one session of ICON resin infiltration with Dr Michael Orlans, completely removing these white spot lesions. We absolutely love this technique. A minimally invasive procedure – ZERO drilling or injections – for such a huge impact.
Book an appointment
Montagu Dental and our team of General Dentists are within a 5-minute walk of Baker Street tube station in the heart of Marylebone, London. We have been caring for patients for over 50 years, and our focus has always been to provide excellent, cost-effective dentistry to patients who feel respected and valued.
To book an appointment, please get in touch by calling us here, or using our online booking form.


Professional teeth whitening explained
Professional teeth whitening is a non-invasive way to improve the appearance of your smile and whiten teeth. Teeth whitening is safe and effective when carried out by a dental professional. Here we look at in-surgery and home whitening options. We will also discuss what professional teeth whitening option is best for you, and what types of whitening should you avoid. Dr Michael Orlans from Montagu Dental explains.
What are the steps for professional home whitening?
Many patients choose home bleaching as they can purchase extra whitening gels to further whiten the teeth, or maintain their new shade. The process typically takes several weeks, but can take up to 6 months in extreme cases if teeth are very yellow or have deep intrinsic staining caused by tetracycline.
The professional teeth whitening process generally involves these 4 steps unless it is a very complex case:
- Have an assessment with a dentist to ensure you are dentally fit to receive home whitening.
- Have a mould or scan taken of your teeth by your dentist.
- Custom trays are fitted for your teeth. A gel is placed inside the trays. You will wear the trays either overnight or for 60-90 minutes during the daytime.
- Continue until you are happy with the results! The time required for whitening depends on many factors but is typically 2-4 weeks.
How does professional in-surgery whitening work?
In-surgery bleaching consists of a 90-minute whitening session in the dental surgery. This will give your teeth an initial lift, but these results will need to be maintained with several days of home-bleaching afterwards. In-surgery bleaching is very popular for these reasons:
- It is a quicker fix than home whitening.
- You will give your teeth a head start before other whitening treatments, and home whitening can be used to maintain the new shade.
- Some patients do not have the manual dexterity for applying the home whitening option.
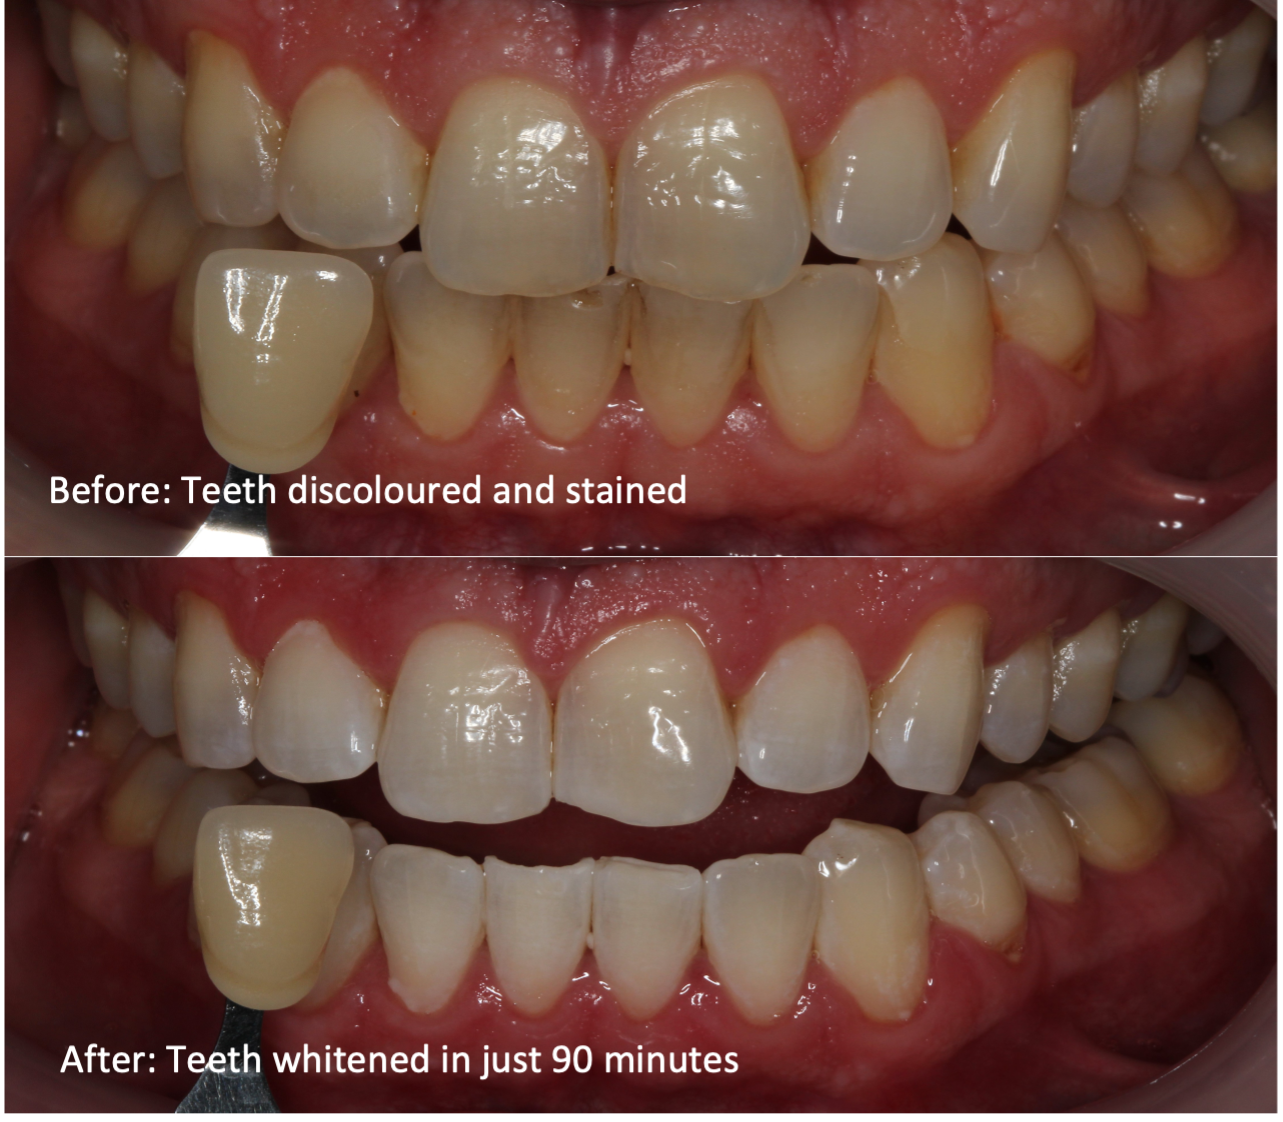
The photos below show in-surgery professional teeth whitening results carried out at Montagu Dental. To view our cosmetic dentistry smile makeovers, please click here.
The duration of the effect of professional tooth whitening varies depending on several factors, including the type of whitening, the patient’s oral hygiene habits, and the person’s diet and lifestyle.
When teeth are topped up with whitening treatments, tooth whitening can last indefinitely. Usually, patients choose to “top-up” their whitening after 1-2 years to maintain the shade they are happy with.
This doesn’t mean starting the process again, but simply buying a top-up whitening gel from your dentist (currently £20 at Montagu Dental).
Will tooth whitening damage my teeth?
Teeth whitening when carried out by a dental professional, and after a full assessment is very safe. Many patients will experience some sensitivity during the whitening process, but this is temporary and is not an indication that harm is coming to the teeth. Illegal and unregulated online products can cause severe damage to your teeth, and this is why you should always choose a professional teeth whitening option with a dentist.
Professional whitening vs. DIY methods
The active ingredients broadly used in professional tooth whitening (hydrogen peroxide and carbamide peroxide) are an effective and safe way to whiten your teeth. However, it is illegal for these to be sold by anyone other than a dentist, in quantities over 0.1%. This amount will have no effect on the whitening of teeth. Only dentists can safely and legally use quantities of up to 6% hydrogen peroxide and 16% carbamide peroxide for a professional whitening effect.
Because of the above, any products bought elsewhere will use alternative ingredients to whiten teeth. Common illegal products such as sodium chloride combined with citric acid erodes the tooth surface. Other products can be very abrasive to teeth. Teeth may appear whiter but ultimately can lead to thinner teeth which can eventually appear yellower.
Products bought online may be illegal and unregulated, and there are documented cases of severe damage caused by such products. Damage may be irreversible, and therefore is strongly unadvised – you only get one set of adult teeth!
Professional tooth whitening also requires a thorough assessment by a dentist, ensuring that your teeth are safe to be whitened, and to establish a diagnosis prior to whitening treatment. Sometimes discoloured teeth are discoloured for a reason such as a necrotic tooth, internal resorption, or developmental issues, which may need to be addressed prior to any whitening treatment or treated in a different way.
Does teeth whitening work on veneers, false teeth or fillings?
Teeth whitening will only work on natural teeth. Fillings, crowns, veneers, or dentures will not change colour. This means that if you have any of these visible, and if they are currently the same shade as your teeth – after whitening treatment your natural teeth will be whiter, and unnatural teeth may appear darker in contrast. If this is the case, you may wish to have these replaced after whitening treatment with a shade to match your new tooth colour.
Can all discoloured teeth be fixed with whitening?
Some very dark teeth may require root canal treatment, or advanced whitening whereby the tooth is whitened from the inside. This will be carefully assessed by your dentist and discussed with you before professional teeth whitening. Some very dark teeth may also require veneers, crowns, or composite bonding to mask the colour.
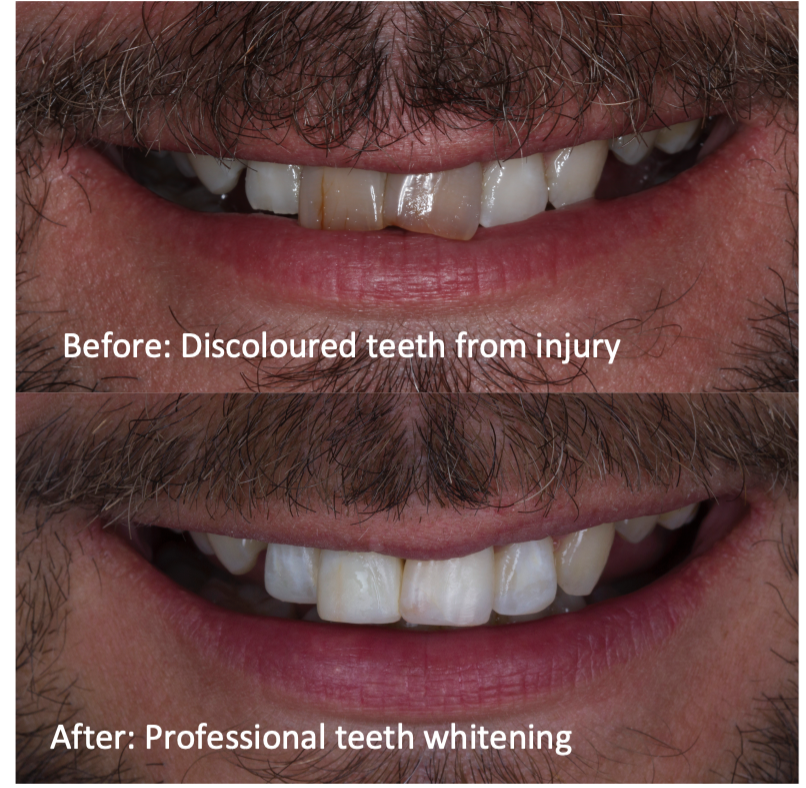
Complex staining such as blue-grey banded staining (from the antibiotic tetracycline), may require a teeth whitening course as long as 6 months.
We are still able to whiten teeth in these extreme cases. The picture below shows necrotic front teeth successfully treated with advanced professional whitening by Dr Michael Orlans.
How can I reduce and treat teeth staining?
Lifestyle factors such as smoking, consumption of dark-coloured drinks (such as coffee, tea, and red wine) and foods can cause teeth to yellow or discolour over time, so it’s essential to take proper care of your teeth and maintain good oral hygiene practices to help extend the duration of the whitening effect.
We are able to remove staining with a variety of methods. Extrinsic staining (stains on the outer surface of your teeth) can be removed with regular dental hygiene visits. Stubborn staining can be removed with airflow treatment, which blasts small particles at the teeth surface to leave them stain-free.
When is teeth whitening not advised?
Professional teeth whitening is illegal for children in the UK (under 18 years old) and should not be undertaken while pregnant or breastfeeding. It is also generally not advised for people with very sensitive teeth, as teeth whitening can increase dental sensitivity. However, special low concentration home whitening gels can be used for a longer duration in cases where teeth are very sensitive.
Will my teeth look ‘too white’ after professional whitening treatment?
Some celebrities you may have seen have teeth that look unnaturally white. This is because they are not natural teeth which have been whitened, but composite or porcelain veneers. Natural teeth always look better when whitened safely with professional teeth whitening treatments.
Professional Teeth Whitening at Montagu Dental.
We offer professional teeth whitening in-surgery or home bleaching kits. We love helping our patients to smile with confidence and to improve the aesthetics of their teeth. Contact us today to see how we can help you.

Dental anxiety & 10 tips to prevent it
Dental anxiety is extremely common. As a dentist it is a daily occurrence that a patient mentions that they fear the dentist, or even that they “hate dentists”! Dental anxiety or dental phobia is real and is something which we take very seriously. We pride ourselves in our ability to help patients to overcome their fears and feel comfortable again with having dental maintenance.
How common is dental anxiety?
A recent UK study shows that up to 53% of patients experience anxiety before visiting the dentist, with 17% suffering from a level of dental phobia which causes them to avoid the dentist completely.
Why you should not avoid the dentist
Avoiding regular dental check-ups can significantly affect your oral health, and mental health in some extreme cases. Problems can include a build-up of plaque and tartar, cavities, bad breath, gum disease and tooth loss. It is not uncommon for those who put-off their visits to have experienced long periods of pain in their teeth and gums, and a lot of mental turmoil as a further result.
10 tips to combat dental anxiety
Here are our best dental anxiety tips to help manage and overcome your fears.
1. Find a dentist that you trust and feel comfortable with
Most dental phobias stem back to a previous bad experience, often in childhood. It is essential that you feel your dentist is someone who can put you at ease and help you regain confidence in having dental work.
2. Book your appointment early in the day, and arrive on time
Anxiety can significantly increase if you are waiting all day for your appointment, so it is best to book it for as early as you can. The same goes for arriving too early at the practice. Aim to arrive within 5-10 minutes of your appointment and take something you enjoy reading along.
3. Communicate about your dental anxiety before treatment
Talking to your dentist about dental anxiety and any specific concerns you have, will help them to understand your needs and to take steps in making you feel more at ease.
4. Ask your dentist to explain what they are doing
A calm description of the procedure will make you feel more confident and put you at ease in the chair. Don’t be afraid to also ask questions throughout the appointment to further reduce nerves.
5. Stay in control and reduce dental phobia using hand signals
Before starting any procedure, speak to your dentist about using a signal, such as raising your hand, to communicate with your dentist if you need a break or are feeling uncomfortable. Knowing you can stop any time will help you to feel more in control.
6. Before leaving the practice, book your next check-up
Never leave the practice without booking your next 6 monthly check-up. Regular check-ups will allow your dentist to tackle issues early when they are smaller and more easily treated. It will also normalise the process as part of your routine and something you will feel more comfortable with.
7. Take treatments one at a time to regain your confidence
Start with the most basic dental treatment, such as a clean and polish or a check-up. Once you feel more confident visiting the dentist, you can start to book the more complex treatments that you need. This process will help you to build confidence in your dentist, their team and within yourself. Remember, if the rungs are too far apart, you can never climb a ladder.
8. Stay motivated and don't be too disheartened by setbacks
For severe dental anxiety, it takes time to truly overcome the phobia. You may make great improvements, and then one day feel like you have lost all confidence again. Do not be disheartened. Speak to your dentist regularly and reflect on the progress you have made so far.
9. Do not let your children know you have dental anxiety
Dental phobias can very easily be passed on to your children. If your children see you are scared of something they naturally learn that it is something to be feared. It is best to always keep calm and talk slowly but confidently about dentistry around them.
10. Consider talking to a mental health expert for severe dental phobia
If your anxiety is severe or difficult to manage, you may want to consider speaking with a mental health professional who can help you develop coping strategies to manage your anxiety. Please ask your dentist for recommendations.
How we can help with dental anxiety at Montagu Dental
All of our team are highly experienced with patients who suffer from dental anxiety, from mild to severe cases. Please do not hesitate to let us know prior to your treatment that you experience this and we will do our very best to make you feel comfortable and relaxed throughout your time with us. Your dentist will cater to your specific needs for a fully personalised and pleasant experience. To book an appointment, please click here.
What are cavity fillings and when should you consider them?
What are Dental Fillings?
A filling is the process whereby decay is removed from a tooth, and a dental material is placed in the tooth. When decay is present, a filling is necessary to prevent the further spread of decay, and to restore the tooth to its natural shape.
Types of Fillings.
The main types of filling materials are composite, amalgam and glass ionomer. Many different types of dental materials are available which can be used to restore a tooth in a filling. The appropriate material will be selected by your dentist based on the specific tooth situation, and also taking into account your wishes and values.
Composite Fillings
Composite is the most commonly used filling material at Montagu Dental. It is a strong, white material, which has good wear resistance and bonds well to natural teeth. This means it can achieve a natural looking result which can last a long time if looked after. As composite material can be bonded directly to tooth tissue, no extra tooth removal is required, meaning a more conservative filling can be done.
Glass Ionomer Fillings
Glass ionomer is a white filling material. It is not as strong as composite or amalgam, but is faster to place and releases fluoride over time. This makes it an excellent choice for children’s filling in baby teeth. It is also sometimes used for semi-temporary fillings.
Amalgam Fillings
Amalgam fillings have a long-proven track record as been a successful dental material. However, many countries have now phased out amalgam fillings due to their mercury content. Although still legal in the United Kingdom, we no longer place amalgam fillings at Montagu Dental as we have such an excellent alternative (composite); which can be used instead and gives us strong fillings which not only look much better, but don’t contain mercury. Amalgam doesn’t adhere to tooth tissue, meaning an undercut is prepared in the tooth, and the material sets inside this undercut, so that it is locked into it like a jigsaw piece. This sometimes means that some healthy tooth tissue must be removed to allow it to stay in. This is another reason why we no longer choose to use amalgam.
You can book an appointment at our practice near Baker St, by clicking here.
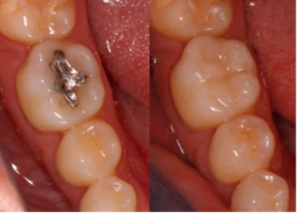
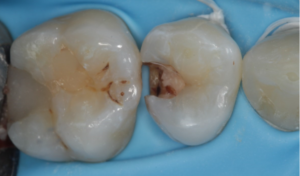
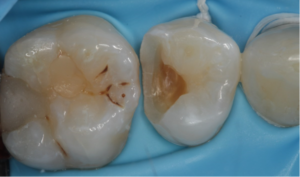
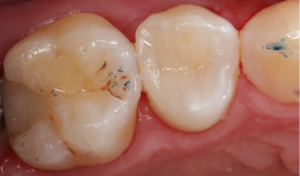
Can an amalgam silver filling be replaced by a white composite filling?
Of course! This is something we love to do as the tooth always looks so much more natural. This will only be done however after careful assessment, as deeper fillings may be best left untouched if they are not causing any problems. The photos show a metal amalgam filling which I replaced with white composite to give a natural look while maintaining the health of the tooth.
How to care for your fillings for greater longevity.
Once you have had a filling, the tooth needs to be cared for in exactly the same way as a natural tooth does. This means regular tooth brushing, and interdental cleaning (cleaning between the teeth) with the use of floss, tepe brushes, or other dental cleaning tools. As always, we
Although fillings themselves cannot decay, the tooth around the filling can still get tooth decay, and gums can be irritated by bacteria. It is crucial to have regular dental check-ups to ensure that your fillings remain healthy, and regular hygiene appointments are advised.
Getting a cavity filled – what to expect.
Getting a cavity filled is no longer something to dread or be afraid of. Modern anaesthetic means that your filling should be completely pain-free. Your dentist will first apply some topical local anaesthetic gel to the area. This takes the 'pinch' out of the anaesthetic which is given a few minutes later.
Once you are comfortable, your dentist will then begin treatment. Often the dentist will place called a rubber dam over the teeth. This is a rubber sheet which allows the water from the drill to be suctioned directly away, rather than accumulating in your mouth. This is especially important if removing an amalgam filling, as it means that no mercury is ingested during removal. The biggest benefit of a rubber dam is that your filling will be placed in optimal dry conditions, which allows us to achieve the best bond possible between the tooth and the filling.
The decay is then removed using the dental drill. Although this can be a little noisy, it is not uncomfortable.
Once the cavity has been fully cleaned (all decayed tissue removed), the tooth is then filled by a careful protocol to restore the tooth to its natural shape.
When should I get a filling if I am also getting Invisalign or teeth whitening treatments?
Prior to any cosmetic treatments such as Invisalign or tooth whitening, it is essential to have any required fillings completed. This is because if decay is present, cosmetic treatments could potentially worsen the problems. Aside from this, our priority is the health of you and your teeth, and we would not complete any treatment before stabilising the health of your dentition first. This would always be assessed by your dentist at Montagu Dental prior to starting any cosmetic treatment.
How often do fillings need to be replaced?
Fillings can last an indefinite amount of time. There is no need to replace a filling just because it is a certain age. Fillings need replacing if they crack, break, or have signs of decay underneath them. Sometimes the tooth around a filling may show signs of cracks, and you may be advised to have a filling replaced, or in some cases something stronger such as an onlay or a crown.
Fillings at Montagu Dental
At Montagu Dental we pride ourselves by using the very latest techniques and materials to produce natural long-lasting fillings. I take photos of all my fillings, which allows me to show my patients at the end of their appointment exactly what I have been working on. Scroll down to see the steps involved in restoring a tooth with a typical composite filling.
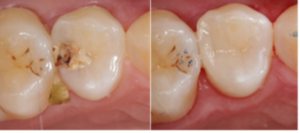
Initial Situation/ Cavity
This tooth has a hole, and food is accumulating inside of it. X-rays have been taken which give us a good idea of the size of the cavity prior to starting.
Rubber Dam Application
The rubber dam is applied (read earlier to find out what this is!) The hole and decay can be better visualised at this stage.
Decay Removal
The tooth is cleaned, and decay is removed. Sometimes some affected tissue is left at the deepest part of the tooth, to avoid the dental nerve and keep the tooth alive. As long as it is completely surrounded by healthy tissue, this decay should be left as it can then no longer spread.
Tooth Restoration
Kept completely dry by the rubber dam, the tooth can then be carefully rebuilt using strong composite material.
Final Polish
The rubber dam is removed and the ‘bite’ is checked. We ask you to bite on some chalky paper, which leaves temporary marks on the teeth (seen in blue on the photo). This allows us to assess the filling and make sure it fits perfectly in your bite. The filling is then polished to give it a natural shine and the process is complete.
You can book an appointment, by clicking here.
To find out more about the steps during an Invisalign journey and to simulate your new smile, please click here.
Other articles you may like:
Prepare your teeth before your wedding day (whitening, hygiene, stain removal and dietary tips)
What does an Invisalign treatment journey look like? (Stages of treatment and smile simulator)

Prepare Your Teeth Before Your Wedding Day
Many of our patients sensibly take the time to prepare their teeth before their wedding day, to promote whiter smiles, better oral hygiene and straighter teeth. Our dentists get regular questions from brides-to-be, and those members of bridal parties; about chipped, discoloured and cracked teeth. To help you throughout your engagement and to allay any concerns about how your teeth will look in photographs, we caught up with Dr Michael Orlans to get his advice on how to ensure you have a near-perfect smile for the big day!
If you are a wedding planner, bridal shop or part of a wedding party, please take a look at our wedding dentistry package deals.
How many weeks before the event should I get my teeth whitened?
Tooth whitening is by far the thing that brides and grooms ask me about most in the lead up to their wedding. This is something I highly recommend as if you are wearing a white wedding dress, your teeth will naturally look darker by contrast.
Whitening your teeth is a simple, safe and non-invasive procedure when done in a professional manner by a dentist. The process should begin at your check-up 6 months before your wedding. Your dentist will make sure that your mouth is healthy prior to embarking on any whitening treatment.
There are 2 options for professional tooth whitening; in-surgery bleaching and home bleaching. The most reliable results are achieved from home bleaching. This typically takes several weeks, but can take up to 6 months in extreme cases if your teeth are very yellow or have deep intrinsic staining caused by tetracycline.
In-surgery bleaching will give your teeth an initial lift, but these results will need to be maintained with several days of home-bleaching.
The best time to whiten your teeth before your wedding, is 6 months before. This will give plenty of time to safely and effectively whiten your teeth. It will also mean you can familiarise yourself with the whitening process without any time pressures. You can then “top up” the whitening 3-4 weeks before the big day to ensure your teeth are looking their best – this doesn’t mean that you would pay twice for the procedure!

How to avoid bad breath on your wedding day.
Many patients are concerned about having bad breath on their big day and this can be easily solved with these 5 steps:
- See a dentist for regular 6 monthly check-ups. This will ensure that there are no last-minute surprises or issues that are likely to arise in the lead up to your wedding. Tooth decay, gum disease or infection from a tooth can cause bad breath which will not go away without the correct treatment.
- Maintain good oral hygiene. Brush your teeth twice/day with good technique, ensuring that every surface of every tooth is cleaned. Flossing or cleaning with interdental brushes (such as Tepe brushes) is a necessary adjunct as a toothbrush alone can only reach 70% of sites in your mouth, meaning around 1/3 of your tooth surface remains uncleaned and can harvest bacteria leading to bad breath.
- Stay well hydrated on your wedding day. Your wedding day will fly by, and you won’t have a minute to yourself without people wanting to speak to you/ dance with you and take photos of you! It is essential to make time to stay well hydrated throughout the day. This will keep you feeling good, and your breath smelling fresh. A dry mouth is a major culprit for bad breath. Frequent sips of water throughout the day can significantly help with this. It is a great idea to appoint a groomsman or bridesmaid with the task of keeping you both hydrated with water throughout the day!
- Brush your tongue. The tongue can harvest thousands of bacterial species. Generally speaking, vigorous tongue brushing is not recommended as this can cause extra growth of your tongue papillae and taste buds which can in turn lead to more bacteria. However, gentle brushing is beneficial, and a good cleaning on the morning of your wedding day will make sure there is no significant build up.
- Avoid eating strong flavoured and heavily spiced foods in the few days leading up to your wedding. This includes onions, garlic, coffee, tea, alcohol.
If after ruling everything out, you are still concerned about having bad breath, speak to your dentist. You may simply be suffering from halitophobia – the FEAR of having bad breath which doesn’t exist.
If your dentist agrees that you do have halitosis (bad breath), and no causes are found, they may refer you to your doctor who can investigate for other causes of bad breath such as tonsil stones or stomach acid reflux issues.
Should I get my teeth cleaned before the big day?
Couples before their big day tend to ask what their oral hygiene routine should be like in the lead up to their wedding. As well as following the advice above, you should visit a dental hygienist. A dental hygienist will remove all calculus (tartar) build up from your teeth, and use techniques such as airflow to remove all staining from your teeth. This is important as a build-up of calculus can contribute to bad breath, as well as being unsightly.
Most patients should see a hygienist for a professional clean every 6 months. It is a good idea to time this so that you have your teeth cleaned 6 months before your wedding, and then again 2 weeks before. This will get you into good habits for 6 months prior to your wedding, which is important as sometimes significant oral health improvements are needed which can take several months to get back on track. A thorough cleaning and stain removal 2 weeks before will ensure there are no unsightly stains on your teeth in the wedding photos! Sometimes teeth can be a little sensitive for several days after a hygiene visit, which is why I recommend 2 weeks before rather than 2 days before. It also gets it out of the way so that you can focus on all your other wedding plans during this busy period.
The best and fastest ways to fix chipped or broken teeth.
All solutions for a chipped tooth depend on how long there is until the wedding, and the severity of the chip.
If the edges of the teeth are worn or chipped, this can usually be repaired with the addition of tooth coloured material, known as composite bonding. This can be done a few weeks before the wedding, but ideally you should have a consultation with a dentist several months before the wedding to allow plenty of time for planning and time after the procedure to ensure you are happy with the results.
For more severe fractures, sometimes it is necessary to cover the front surface of the tooth with a veneer, or sometimes a crown which goes all the way around a tooth. These procedures require a little bit more time and planning. You really want to allow plenty of time to make sure the procedure is completely finished a long time before your wedding. Front teeth can be difficult to match exactly, and sometimes veneers/crowns need to be remade a number of times to get the correct match, and this extra time should be taken into account and allowed for.
Is there time to straighten my teeth before my wedding?
Many people decide that they want to have straight teeth for their wedding (and for the all-important wedding photos!). The length of time needed to straighten teeth depends on the starting position of the teeth, and the patient’s goals for treatment.
If someone is entirely happy with how the back teeth sit and function, it is often desirable just to straighten the front 10 pairs of teeth. This can typically be completed within 6-8 months. If more complex movements are required, and the back teeth need repositioning, tooth straightening (orthodontics) can take several years.
Ideally, I would like my patients to give as much notice as possible to start their tooth-straightening journey. This gives us time to properly plan and achieve the best possible results. It is therefore worth speaking to your dentist as soon as possible if you are considering straightening your teeth before the event.
Clear aligner teeth straightening systems (e.g. Invisalign) are more discreet, and can be taken out for your wedding day if you are still undergoing treatment at this stage. However, you may still have some attachments (tooth coloured buttons on some of your teeth) which although are very subtle, may be noticeable on some close-up photos.
If there is only 3 months or so until the wedding day, it would likely be too late to straighten your teeth, and other options such as tooth whitening should be considered.
Having straight teeth can really improve your confidence in your smile, and is definitely a conversation worth having with your dentist if it is something you are considering.
The SmileView Visualiser Tool allows you to see what your new smile may look like with Invisalign in just 60 seconds, simply by taking a selfie! This technology is a great way of immediately seeing your results after the full Invisalign treatment. You can view your simulation by clicking here.
To read more about the Invisalign process, please read our Invisalign Journey article, by following this link.

Avoid these three big mistakes in your pre-wedding diet:
Many people follow specific diets in the lead up to their wedding. Changes in dietary habits can cause changes to your teeth. Be sure to avoid these three big dieting mistakes!
- Not having substantial meals.
It is important to have 3 substantial meals a day to stop you from being hungry and snacking. Regular snacking can cause tooth decay as teeth require time to recover and repair after an intake of foods, or sugary and acidic drinks.
- Substituting fats and carbs with acids.
Many diets allow (and sometimes encourage) lots of highly acidic foods such as balsamic vinegars, apple cider vinegars and lemon juice. Whilst these are very flavoursome and much less fattening than alternative dressings such as olive oils, they are highly acidic and can cause significant damage to teeth if consumed on a regular basis.
- Substituting snacking with tea, coffee, or cigarettes.
The chief culprits for staining teeth are tea, coffee, red wine, and smoking. High quantities of these should be avoided to keep your teeth looking their best!
Dr Orlans is available for appointments Monday-Friday at Montagu Dental. To schedule an appointment, please click here.
If you are a wedding planner, bridal shop or part of a wedding party, please take a look at our wedding dentistry package deals.
What does an Invisalign Treatment Journey look like?
Here at Montagu Dental, the start of each Invisalign treatment is always an exciting time. We love these journeys, as time and time again we get to see our patients improve their dental aesthetics, health, wellbeing, and overall confidence. Here Dr Michael Orlans took us through the stages of a typical Invisalign journey, and what you can expect along the way.
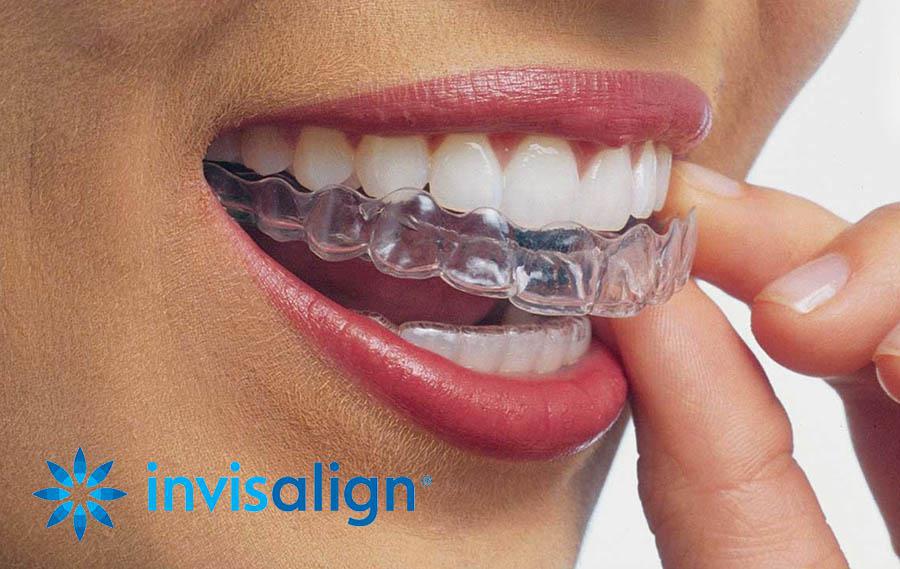
What is Invisalign?
Invisalign is a relatively new solution to teeth straightening, which has become widely available in dental clinics around the world. They are a great choice if you don’t want to wear braces and treatment can be a quicker than wearing traditional orthodontics. As the trays are almost invisible, Invisalign has allowed patients to feel more comfortable wearing orthodontics in their daily lives, and this has encouraged more patients to choose the treatment over other teeth straightening solutions.
But what are the stages of Invisalign treatment, and what can you expect from your journey here at Montagu Dental?
Appointment 1 – Invisalign Consultation
This is where it all begins. The main things that we need to find out at this stage are what your treatment goals are. We will listen carefully so we understand exactly what it is you would like to change about your teeth and why. It important to be as detailed as possible at this stage to ensure we can achieve your goals! We will have a look at your teeth, and give an indication about what is possible, and a rough guide of what outcome we can expect to achieve. We will also explain the Invisalign process to you in more detail and assess your suitability.
Before moving on to the next appointment stage, we must ensure that you are in good dental health. Orthodontic treatment cannot begin unless you are completely dentally fit. This means that you don’t have any dental pain, tooth decay, or active gum disease. If you have come from another dentist, we will require a letter from your previous dentist stating that you are dentally fit, or alternatively we can do a full dental check-up for you. We also need to take a panoramic x-ray. This is an x-ray of all your teeth and roots. It is important that we take this x-ray before embarking on orthodontic treatment to make sure there are no issues with your teeth or roots. Invisalign is safe, but if there are existing problems it could cause larger issues if these are not addressed first.
Appointment 2 – Record Taking
At the second appointment, we will take a full set of clinical photographs. We will then take moulds or scans of your teeth. These need to be completely accurate, as if there is any discrepancy, the Invisalign aligners won’t be able to accurately move your teeth!
Appointment 3 – Invisalign Clincheck
At this appointment, we will show you a detailed simulation of how your teeth are predicted to move, and how long we expect the treatment to take.
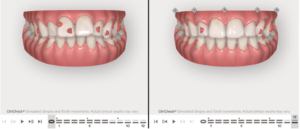
What is a clincheck?
An Invisalign clincheck is a digitalised simulation which allows us to show you your teeth and how they are predicted to change. It is a 3 dimensional model on the computer which allows us to view all different angles, and is a great tool to allow us to talk you through the treatment and visualise the plan. As well as visualising the outcome, the clincheck also shows us how long this treatment is predicted to take, where the attachments need to be placed, and how much interproximal reduction (if any) is required. (Please see "Appointment 4 section for more info).
After seeing the simulation, there are three options for you:
- Accept – You may be very happy with our plan and decide to proceed with treatment. At this point you will pay a deposit and we will place the order for your first few aligners.
- Decline – You may decide that you don’t want to go ahead with treatment. This very rarely happens, as we assess your suitability prior to getting to this stage. It is good to know however that you do have this chance to decide to not go ahead with treatment before making any substantial financial investment as you have not committed to the process yet.
- Modify – You may like what you see in the simulation but prefer to change the final position of one or more of the teeth. This is unusual, as we plan every case carefully before reaching this stage to achieve the best possible outcome. However, if you would like to see something slightly different, we can modify the plan and arrange a future visit to present to you a new clincheck.
This is generally a quick appointment, and typically lasts around 20 minutes.
Appointment 4 – The Bond-up
This is the big day! The day where you begin the treatment phase of your journey. By this stage, you will have been shown the plan at the previous appointment, so there are no surprises on the day.
The first stage is to bond the attachments. The attachments, or “buttons”, are made of composite which is a tooth-coloured material. This is loaded into special trays which fit over your teeth. Your lips are retracted to give us full view and access to the front surfaces of your teeth. We then apply a gel to your teeth to prepare the surface for bonding. The trays are then seated and ‘cured’ using the dental light. When we remove the trays, the attachments are in place on the teeth!
The number and position of attachments are unique to every case. See if you can spot all of the attachments on the photo below!
We then perform the interproximal reduction (IPR) where required. This is where we carefully remove very small bits of enamel from between the teeth to provide space for the teeth to be moved to their desired position. Anaesthetic is not usually required for this, although we can administer it if you would like. IPR generally feels like heavy flossing and can sometimes be a little tender on the gums during the process.
Following IPR, we fit your first aligners and show you how to insert and remove them. This is often a challenge the first time you do it but you get used to it very quickly! We will also give you an Invisalign ‘chewy’ and show you how to use it to help with seating the aligners. To learn more about chewys, click here.
This appointment typically takes between 60-90 minutes.
Appointments 5++ – Review Appointments
We typically want to see you once per month. Generally, review appointments are quick, and last between 15-30 minutes. At these appointments, we check that the teeth are moving as they should be, and that the aligners are fitting sufficiently well. The number of review appointments needed depends on how many aligners are in your treatment plan. This is dictated by your treatment needs, which is outlined at your clincheck appointment.
We make sure you are comfortable with the process and answer any questions you may be having! Usually at these appointments we take the next payment instalment. If you prefer, we can sometimes do these review appointments remotely, although generally we like to see you face to face for a thorough review and monitoring of the process.
Invisalign De-bond Appointment
After you have completed your aligners, you will then see us for a final assessment. If you are happy with the position of your teeth, and we are happy with the position of the teeth, we will carefully remove the attachments, and take impressions for your retainers. This appointment typically takes around 45-60 minutes.
Final Visit - Fit of Retainers
At your final visit, we will take final photographs and fit your retainers. These photographs can be used for future monitoring. After you complete your Invisalign treatment, we will review your dentition at regular check-ups and work with you to make sure your teeth stay in the right place!
How long does Invisalign take to work?
In most cases it takes 6 – 12 months, however it can take longer depending on the patient’s teeth. If the case is more complex, the patient may need to wear the retainer trays for up to 2 years.
How do I see an Invisalign Simulation?
The SmileView Visualiser Tool allows you to see what your new smile may look like in just 60 seconds, simply by taking a selfie! This technology is a great way of immediately seeing your results after the full Invisalign treatment. You can view your simulation by clicking here.
Book your Invisalign Consultation
To book your Invisalign consultation please follow the link Book Today